SpringBoot2 入门
SpringBoot 是集成了 Spring 等等框架和技术栈的启动框架,它只需要配置少量的 Spring configuration, 就可以帮助我们开发出独立的,高质量的,基于 Spring 的应用,并且可以把应用打包成 jar 或者传统的 war
❤️官方文档
Install
System Requirements
SpringBoot Vesion 2.7.1
Base: Java 8+
IDE: IDEA 2022.1
Build:
| Tools | Vesion |
|---|---|
| Maven | 3.5+ |
| Gradle | 6.8.x, 6.9.x, 7.x |
Maven 设置
<mirrors>
      <mirror>
        <id>nexus-aliyun</id>
        <mirrorOf>central</mirrorOf>
        <name>Nexus aliyun</name>
        <url>http://maven.aliyun.com/nexus/content/groups/public</url>
      </mirror>
  </mirrors>

  <profiles>
         <profile>
              <id>jdk-1.8</id>
              <activation>
                <activeByDefault>true</activeByDefault>
                <jdk>1.8</jdk>
              </activation>
              <properties>
                <maven.compiler.source>1.8</maven.compiler.source>
                <maven.compiler.target>1.8</maven.compiler.target>
                <maven.compiler.compilerVersion>1.8</maven.compiler.compilerVersion>
              </properties>
         </profile>
  </profiles>
Hello World
新建 maven 工程
引入依赖
在新建的 maven 工程 POM 里,加入 SpringBoot starter
<?xml version="1.0" encoding="UTF-8"?>
<project xmlns="http://maven.apache.org/POM/4.0.0" xmlns:xsi="http://www.w3.org/2001/XMLSchema-instance"
    xsi:schemaLocation="http://maven.apache.org/POM/4.0.0 https://maven.apache.org/xsd/maven-4.0.0.xsd">
    <modelVersion>4.0.0</modelVersion>

    <groupId>com.example</groupId>
    <artifactId>myproject</artifactId>
    <version>0.0.1-SNAPSHOT</version>

    <parent>
        <groupId>org.springframework.boot</groupId>
        <artifactId>spring-boot-starter-parent</artifactId>
        <version>2.7.1</version>
    </parent>

    <dependencies>
        <dependency>
            <groupId>org.springframework.boot</groupId>
            <artifactId>spring-boot-starter-web</artifactId>
        </dependency>
    </dependencies>

    <!-- Additional lines to be added here... -->

</project>
run mvn dependency:tree or Reload Maven Project
使用的依赖就会全部被导入
创建主程序
基础的目录结构
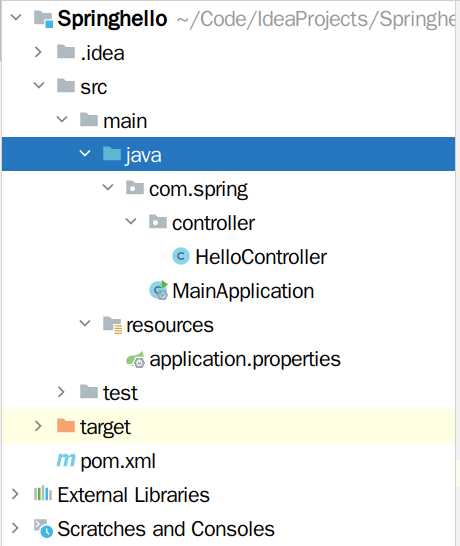
src/main/java下放 java class 文件src/main/resources下放配置文件target下存放生成文件,和打包好的文件
Main
在MainApplication 类里(名字不唯一),实现 SpringApplication 的 main 方法
整个项目的都从这里开始,如果是 web,直接运行 main,就启动了,无需配置 tomcat
package com.spring;

import org.springframework.boot.SpringApplication;
import org.springframework.boot.autoconfigure.SpringBootApplication;

/**
 * 主程序类
 * @SpringBootApplication:这是一个 Springboot 应用
 */
@SpringBootApplication
public class MainApplication {

    public static void main(String[] args) {
        SpringApplication.run(MainApplication.class, args);
    }
}
编写业务
package com.spring.controller;

import org.springframework.stereotype.Controller;
import org.springframework.web.bind.annotation.RequestMapping;
import org.springframework.web.bind.annotation.ResponseBody;
import org.springframework.web.bind.annotation.RestController;

//@ResponseBody
//@Controller
// @RestController 该标签取代了上面俩
@RestController
public class HelloController {
        @RequestMapping("/hello")
        public String handle01(){
            return "Hello spring boot";
        }
}
测试程序
直接运行 main 方法
简化配置
在resources/application.properties中配置服务和应用的内容,例:server.port=8888
简化部署
POM 中加入
<build>
    <plugins>
        <plugin>
            <groupId>org.springframework.boot</groupId>
            <artifactId>spring-boot-maven-plugin</artifactId>
            <version>2.7.1</version> //与 starter-parent 的版本一样
        </plugin>
    </plugins>
</build>
spring-boot-maven-plugin not found 是因为没有版本号,手动加上就可以了
最后在 maven-->Lifecycle 中选择打包方式,再Run Maven Build, 创建 jar 包,在目标服务器运行即可
使用 java -jar
/path/to/xxx.jar运行 jar